
Welcome to Stonefield!
This is our second area and you really should be level 20 before coming in here. The level 19 mobs are only at the beginning and soon raise a few levels quickly.
We're going to be making our way to Granite Falls which is the main town for this area.
Entering Stonefield you should have the following Quests
- (Story) The Saga of the Endless: On the shores of Freemarch
- (Story) The Means of the Endless
- (Story) Forces of the Plane of Death (If you haven't closed 8x Death Rifts since we took it at level 16)
- (Zone) A Miners Job
- (Zone) Assistance for Granite Falls
The important ones are the 2x Zone quests from Freemarch. But if your just starting from here, don't worry, just make sure you do the group quests to complete the zone quest achievement.
So lets get to it!
Simple Rules
- Spend your Soul points in DPS talents throughout this guide at each level up.
- Ensure you learn your next level talents at your Class Trainer.
- Sell Junk at any Vendor you see.
- Keep an eye out for artifacts in buildings or laying on the ground.
- Take all quests in order they are mentioned as some quests wont be available until you hand in a particular quest to unlock it.
- Try to participate in at least 2-3 Rifts, an Event or PVP per level to help break up the questing and gain a little extra exp and planarite. If you get involved in an Event, you can quite easily gain a level very quickly doing multiple rifts.
- You'll come across quests that aren't included.. this is because they are either class or racial quests. By all means take them and do them. Just look at the guide a few steps forward to see if it takes you there anyways and do the quest with the guide.
- Enjoy the scenery & have fun!
Color Code
- Quests
- NPC's
- Objectives
- Locations
- Notes
- < Achievements > (mouse over to view)
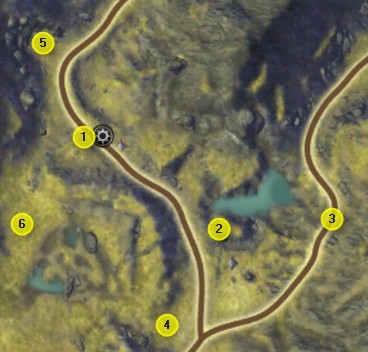
Stonefield

- (1) From Meridian, head north towards Kings Retreat. You see (2) Megan Rae just outside of the Iron Tomb Passage.. Talk to her and take Protecting Meridian's Walls and Changing of the Guard.
- Just west kill 8x.. the 5x assassins are near trees to the South and appear when you come close to them.
- Return Megan Rae just outside of the Iron Tomb Passage.. Talk to her and turn in Protecting Meridian's Walls and Changing of the Guard.
- Head North through Kings Retreat, and the Ark of the Asended and cross the bridge.. (3) take the left path at the fork and follow it around into Stonefield and then Far Mine Loop.
- (4) Talk to Hiram Merp and turn in Assistance for Granite Falls (This should reward you with the achievement The Long March).
- Talk to Pickaxe Threnner and turn in A Miner's Job and accept Road Rocks and Hazard Pay.
- Start killing 8x Rams and Rocky Shamlers to collect 8x Oreling Stones (or collect them off the ground).
- Note: Gorehorn the Mighty roams up on the plateau in this area.
- (5) Head South along the road to Tarresen Doen and accept his quest Don't Touch My Grengrug and escort the Underpaid Courier up the hill .. you'll have 3 waves to defend him against.
- (6) Either swim west through the lake or follow the dirt path around the lake until you get to Quarystone Basin.
Quarystone Basin
Note:1 A Rare, Rendfang, Patrols between the Lake and Quarystone Basin Camp.
Note:2 You should recieve A Strange Device, after killing a Troglodyte (not always first kill). Accept the quest and hand it in to Bartholomew Cleary.
- (1) Talk to Passel Drobe, turn in Don't Touch My Grengrug.
- Talk to Bartholomew Cleary, turn in Road Rocks, Hazard Pay and accept Unusual Results.
- Talk to Forrest Haener, accept Miner's Things and Fight the Troglodytes.
- Talk to Violet Harwood and accept Too Dumb For Words.
- Sell Junk.
- (2) Go back the way you came to the camp beside the Lake (Felix's Camp) and then use the Darcomecron in your backpack whilst standing near Felix's body.
- (3) Follow the road North up Quaristone Road until you get to the Old Idol overlooking the Lake and then use the Darcomecron in your backpack.
- (4) Head South back down the hill and find a large Stonecrush Troll, beat him down to 30% and click the Control Collar in your backpack.
- You only have 1 minute so Head back to Violet Harwood and turn in Too Dumb for Words and accept Brains!.
- (5) Head North West a little to a small camp and click on Haerner's Favorite Shovel and Haerner's Lucky Pickaxe heading to the cave behind it. Remember to kill 8x Stonecrush Squatters as you go.
- Inside the cave Head to the Purple Crystal and click the Darcomecron in your backpack and then click on Haerner's Trusty Backpack a few steps further in.
- Make your way out of the camp and ensure you have killed enough Squatters for your quest.
- (6) Head South killing Trolls until you get 6x Troll Brains. (These had a 1/3 drop rate for me.)
- Return to the Quarystone Basin Camp and talk to Violet Harwood again. Turn in Brains and accept Functionally Illiterate.
- Sell Junk.
Quarystone Basin: Part 2

Note: Keep an eye out for a Bloody Spaulder that drops from a Troll (check your back pack in case you've already received it). Accept Victim of the Stonecrush and turn it in to Alixia Deanthor when you get to Coterie Camp.
- (1) Talk to Forrest Haener, turn in Miner's Things and Fight the Troglodytes.
- Talk to Bartholomew Cleary, turn in Unusual Results and accept A Rocky Problem.
- Talk to Bram Caulker and accept The Long Arm of Eth.
- Talk to Passel Drobe and accept Another Troll, Go. (I took Defending the Defiants in case i was able to find a group doing them, they are 20 elites so soloing them is not viable).
- (2) Head directly west to the Troll Glyph and click on it to inspect it.
- (3) Head south back to where you killed the trolls and collect 6x Deathly Shards off the ground.
- (4) Head up the mountain with the Troll camp to the north (5) and click on the telescope, turn in The Long Arm of Eth and accept View from the Hill.
- (6) Kill Thingar then jump down the cliff to the lower ledge and then down to the ground level.
- (7) Head South East to the Ethian Chest.
- Click the Ethian Chest, turn in View from the Hill and accept The Ethian Device. (2 Ethian Spirits spawn to attack you, kill em they are easy).
- Head back to the Quarystone Basin Camp.
Quarystone Basin: Part 3

- (1) Talk to Violet Harwood, turn in Functionally Illiterate and accept Mind the Trolls.
- Talk to Passel Drobe and turn in Another Troll to Go.
- Talk to Bartholomew Cleary, turn in A Rocky Problem and The Ethian Device.
- (2) Head west back to the Troll Glyph and click on the pink slurry in your backpack and then on the Troll Glyph.
- (3) Make your way south along the mountain and up onto the first plateau (where you headed up to kill Thingar earlier) to the next troll glyph and repeat for the first one your did.
- (4) Head Westerly up the hill just behind the Tent with the Giant and repeat again.
- (5) Head South across the mountain and the 4th Troll Glyph should be in front of you in the open.
- Return to Violet Harwood, turn in Mind the Trolls and accept Mystery Solved.
- Sell Junk.
Coterie Camp

- (1) Head South East onto Quarystone Road and follow it to the first path leading off to the left with road signs to (2) Coterie Camp.
- Talk to Lyndon Kassel, turn in Mystery Solved and accept Skeletons Of The Past.
- Behind you in the tent just up the hill a little bit, talk to Alixia Deanthor, Accept Bad for Business and Breaking the Breaker (turn in Victim of Stonecrush if you received Bloody Spaulders).
- Up the Hill further in the tent where the mail box is, talk to Kira Thanos and accept An Unwanted Assignment.
- (3) Head back down the path the entered on, you'll see a rock on the other side of the road opposite the wagon. Behind that is the Buried Artifact, loot it.
- Kill Trolls whilst completing the gathering quests until you have 6x Mountain Troll Hearts and killed 6x StoneCrush Trolls and 6x Dreadbone Trolls.
- (4) Just a little further to the west is a rock with bones over it that resembles a hand, Titans Right Hand to be more exact. Move close to the rock and click Lyndon's Darcomecron in your back pack. Kill the 2 spawns that come out.
- (5) Further west you'll see Bones that look like a Titan's Rib Cage, go to it and click Lyndon's Darcomecron.
- (6) Head South towards Titans Skull and scan it from inside the jaw.
- Further Inside the Skull, click on the Desperate Miners Stash and then fight off the 3 Desperate Miners. Congrats you just got the achievement < Red Handed >. (Note you do not need to defeat the 3 Miners to get this achievement and you may even die.)
- (7) Head North to Titans Left hand, similar to the right hand.. you can enter the brown bracer and stand on the rock to click Lyndon's Darcomecron.
- (8) North East of the Left Hand is the Broken Artifact.. collect this.
- (9)Just North West of this is a large bone sticking out of the ground Titan's Leg.. get close and scan this also.
- (10) North West of here is the Shattered artifact up a small hill between the rocks. click it to loot it. Kill the Risen Horror that spawns.
- (11) Continue North West along the left side of the hill towards Bonebreaker's Cave.
- Click on Bonebreakers Fire and kill Bonebreaker when he spawns in the cave behind the camp fire.
- Kill any remaining Trolls you need whilst heading back to Coterie Camp.
- Talk to Lyndon Kassel, turn in Skeletons of the Past and accept Slivers.
- Talk to Norbert Denbur and accept Why Ask Why?
- Talk to Alixia Deanthor, turn in Bad For Business and Breaking the Breaker.
- Talk to Kira Thanos and turn in An Unwanted Assignment.
- Sell Junk.
Coterie Camp Part: 2

- Head out of the camp back to Titans Rise (where all of Titan's Bones are) and collect 6x Rust Slivers. Also target 6x Trolls and use the Rage Extractor on them before killing them.
- (1) Head back to Coterie Camp once those 2 quests are complete.
- Talk to Lyndon Kassel, turn in Slivers and accept A Kind of Magnetism.
- Talk to Norbert Denbur, turn in Why Ask Why? and accept Stonefeather Extractor.
- Talk to Crim Tinshin, accept Cheap Eats and Foul Flesh.
- (2) Head West out of the Camp and take the road west to the top of the hill.
- Start killing Stonefeather Terrors/Rocs as you then head North West into Stonefield Prairie. Make sure you use the Rage Extractor on them before you kill them x4.
- (3) As you travel along the rocky hill you will see a table by an old dead tree. Place the Box of slivers in your backpack on the table and then kill the 4 Attracted Dreadbones as they come at you one at a time.
- (4) Continue heading Northwest killing Sicklehorns and Stonefeathers until you have 8x Pungent Bird Meat, 10x Sicklehorn Chops. (Bucks had a 100% drop rate for me, Grazers only a 1/3)
- Once completed, head back to Coterie Camp.
- Talk to Lyndon Kassel, turn in A Kind of Magnatism.
- Talk to Norbert Denbur, turn in Stonefeather Extraction and accept Norbert Unleashed.
- Talk to Crim Tinshin, turn in Cheap Eats, Foul Flesh and accept The Secret Ingredient is Lymph.
- Talk to Keegan Quandra, accept Escalating Maneuvers and Let None Live.
- Sell junk.
Coterie Camp: Part 3

- (2) Head out of the camp and follow the road west to the top of the hill like before, then head south along the grassy path to Norberts Campsite.
- (3) Use the Rage Extractor on Norbert and wait for him to turn into a Troll. Beat him down until he is subdued and changes back to himself again.
- (4) Head back down the mountain and then west along the road to Dreadbone Shelf.
- Kill 12x Dreadbones whilst collecting 10x Light Lymph's from them. Also kill 10x Sickles and 12x Youngspawns in the area. (Note: The Youngspawns run away from you when you approach.. try to use range or even Aoe effects if you can).
- Once you have completed these, head back to Coterie Camp.
- Talk to Norbert Denbur and turn in Norbert Unleashed.
- Talk to Crim Tinshin, turn in The Secret Ingredient is Lymph.
- Talk to Keegan Quandra, turn in Escalating Maneuvers and Let None Live. accept War on the Dreadbone and Korbosh.
- Talk to Teela Shale and accept An Unsober Proposition.
- Sell Junk
Note, you should be level 23+ by now.
Coterie Camp: Part 4

- Head out of the camp and west along the road again to Dreadbone Shelf.
- (2) Right on the bend there is a path heading South West. Take this path up to Korbosh.
- Ensure you kill the 12x Trolls needed for the quest and gather 10x Grengrubs on your way.
- (3) Kill Korbosh and then click on the Troll Glyph in his Hut to get the achievement < Message Received! >. Then finish gathering Grengrubs and killing the Trolls you need to complete you remaining quests.
- Head back to Coterie Camp.
- Talk to Keegan Quandra, turn in War on the Dreadbone, Korbosh. (Woot! our first ring!) and accept Existential Dreadbone.
- Talk to Teela Shale, turn in An Unsober Proposition and accept The Stone Flask Tavern.
Granite Falls

- Head out of Coterie Camp and follow the road West through Dreadbone Shelf to Granite Falls.
- (1) As you enter Granite Falls, head to the left and go to the Porticulum to unlock it.
- (2) Run back to the road and talk to Lewin Dinford, turn in Existential Dreadbone and accept All that Remains.
- Talk to Rayner Kole, accept Unwanted Bones and Bury the Dead.
- Head up the mountain behind Rayne and Lewin to The Harrow (Graveyard) which is North East of Granite Falls.
- (3) Collect 10x Rotting Scraps, kill 18x Undead, Collect 10x Undead Skulls whilst you head to the fenced in graveyard next to the church.
- Kill the Darkclot on the right hand side next to the large tombstone and loot the Rusted Key.
- (4) Head inside the old church to the back and loot Lewin's Scepter.
- Make sure you gathering and killing quests are complete before heading back to Granite Falls.
- Talk to Lewin Dinford, turn in Unwanted Bones, All that Remains and Underground Consecration.
- Talk to Rayner Kole, turn in Bury the Dead, accept Dust to Dust and Silencing the Crypt.
Granite Falls: Part 2
 |
| Sadly there is no map of the Crypt :( |
- Sell Junk.
- (1) You should be able to purchase your first Trinket from Quatermaster Verdson near Levin and Rayner.
- (2) Head back up to The Harrow and go behind the church into a cave (Harrow Crypt).
- Head to the bottom and talk to Elysia Raymond and accept Wrongfully Buried.
- Head all the way to the bottom of the crypt and talk to Uriel Chuluun and accept Rebuilding Mystery.
- Just behind the ramp you came down is the First Device Fragment (Note you will have to go around the ramp to access it as there is a fence blocking the path.).
- Head South East along the Eastern wall to the Third Device Fragment (Underneath a bush nest to a rock).
- Further South along that Eastern wall is the Second Device Fragment (In a old cabinet).
- Further South is a Tormented Shadespawn, kill it to retrieve Elysia's Pendant.. you should also get a Dark Crest which is a quest, accept The Dark Quest.
- Whilst your here, Move in close to the large tombstone (Tainted Stone) and use the Sceptre of Cleansing in your backpack.
- Head back North through the Crypt back to Uriel Chuluun and turn in Rebuilding Mystery.
- Head back up the ramp making sure you have killed 12x Thralls, 10x Shadespawns, Collected 6x Shade Moss whilst heading to Elysia Raymond (2nd Level) and turn in Wrongly Buried.
- Make your way out of Harrow Crypt and back to Granite Falls the same way you came in.
Granite Falls: Part 3

- (1) Talk to Lewin Dinford, turn in The Dark Crest, Underground Consecration and accept Record of Destruction.
- Talk to Rayner Kole, turn in Dust to Dust and Silencing the Crypt.
- (2) Head North East to the barn/hospital. Talk to Joyce Daley and accept Helping the Sick.
- Head inside and target 5x Ailing Citizens and click the Blood Extractor in your backpack.
- (3) Head further into town and across the lake to the Inn. Talk to Alia Swan and accept Scared Riftless. (Rift Daily).
- Inside the Inn, The Drink Grengrug quest is a timed quest that begins the second you accept it! Read the following first:

- You must fill up 10x empty mugs within the time limit. as long as you do not stop you wont have a problem. The same mugs pop up in the same order:
- (1) First is over on the left side table by the window next to the fireplace.
- (2) Second is to the left just around the corner on a small table between 2 chairs.
- (3) Third is the left end table (coming from the 2nd mug) near the bar.
- It uses the same combination so its just a matter of running 3-4 loops and click on the mugs. You can not stop at all.. and you can use speed effects if you have them.
- Inside the Inn talk to Jacksen Winsley, turn in The Stone Flask Tavern and accept Drink Grengrug.
- Talk to Jacksen Winsley once completed and turn in Drink Grengrub.
- Head outside, talk to Adriana Weaver and accept The Corpse of Arthur Thorne.
- Talk to Aiden Blackstone, turn in Helping the Sick, accept Open Invitation, Search for the Core and A Miner Compilation.
Granite Falls: Part 4

Note: On the mountain side of the lake is 2x rare spawns, Gormungun and Stone Rend (in the water beside the large rock). Keep checking every time you pass this area < Stonefield Defender >
- Sell Junk.
- (1) Head South out of Granite Falls up the hill and take the (2) first left at the fork in to Deepstrike Excavation.
- Kill 12x Miners, 5x Overseers and 3x watchers as we head south east along the left mountain wall.
- (3) Head up the mountain behind the first building to the first building up on the 1st level and kill the mob on the deck to get Arthurs Locket. Remember to look for the Sourcestone Dust piles on the ground in your travels.. they can yield up to 5 dusts.
- Once you have Arthurs Locket, click it to complete the quest.
- (4) Head towards the Mine and go up the Left side on the outside.. your going to the top of it to talk to Uriel Chuluun, accept Energy Analysis.
- (5) Turn around and walk around this area until a purple circle appears.. then use the Energy Extractor in your backpack. Repeat this 5 times.
- Talk to Uriel Chuluun, turn in Energy Analysis.
- Finish off what you need to kill (overseers for the reports) and collect, before heading out of the excavation site.
- (6) Once you are at the crossroad outside the excavation site.. you will see a tall 3 platform wooden structure on a small hill. clear your way to it.. I'm going to link to a YouTube video that i found work, rather than explaining.
- Once you get the Lucky Pick, accept its quest Hard to Pick and turn it in to Pibit Farthing at the bottom of the wooden structure.Head back to Granite Falls.
- Talk to Aiden Blackstone, turn in Search for the Core, A Miner Compilation and accept Extra Strength Relief.
- Head into the Inn and go all the way through to the back. Talk to Tigram Stillstep, turn in The Copse of Arthur Thorne and accept Shakedown.
- Head out of the in and talk to Adriana Weaver, turn in Shakedown and accept The Mousetrap.
- Head Across the lake, talk to Lewin Dinford, turn in Record of Destruction and accept Who Were the Titans?
- Head back to the Barn with the Ailing Citizens in it and target 5 of them and use the Fluid Injector on them.
- Optional Dungeon Quests: Talk to Emily Fergal, accept Slaughtering the Butchers.
- Optional Dungeon Quests: Talk to Torin Fergal, accept The Foreman's Disgrace and Gregori's Revelation.
- Head across the bridge to Talk to Aiden Blackstone, turn in Extra Strength Relief.
Granite Falls: Part 5 (Getting 3x achievements and 1x puzzle for Stonefield)

- (1) Head out of Granite Falls to the South and take the Right at the fork. (Note: Ignore the Camp Quests and Darcia on the road for the moment)
- (2) Head North West along the road past Camp Fergos until you see a tree up the mountain on the right.. head up there and click on the lockbox behind the large boulder. Stillsteps Lacky Spawns, kill him to retrieve Arthur's Key and then click on the Lockbox again and loot the Keystone.
- (3) Continue up the Mountain (just a little to the right of where you are now).. you'll need to work your way up. You will come across the (4) Spinning Plates Puzzle Click the link for more on how to do this.
- (5) Once completed, head further up the left side of the mountain and you will come off the grass and onto rocky terrain.. if you look to your right, you will see a tree through the gap.. Through this gap and to the right is a Cairn. It offers a Dusty Sack, open it for a reward. (Note it only offers a reward the first time.. everything after that is only worth 1 silver.)
- Head back through the rocks you just came from and hug the mountain side to the grassy area overlooking Scarlet Gorge. Once on the grassy area, you should hear the falls.
- (6) Head north towards the big windmill and between the two rocks you will come to several squirrels that when you approach will start to dance.
- Type '/dance' to earn the achievement < Dancing with Squirrels >
- (7) Head south and up the hill further and you should get the achievement < Mountain Climber >.
- (8) Head South from here to the edge of the cliffs on the left side of a clump of dead trees to ensure you don't hit the cliff on the way down.. Point your mount to the left a little of the highest Waterfall.. Take a run up and jump at the last second. *MAKE SURE YOU'RE MOUNTED FOR THIS!*
- You should have landed just past the huge Rock in the middle of the lake and received the achievement < Plop! >and the Title: The Daredevil.
- Head South East past the Inn and talk to Adriana Weaver, turn in The Mousetrap and accept Dead in the Water.
- Head behind the Inn back to the lake you just jumped into and kill a Fall Walker, use the Keystone on the corpse then kill the Energised Fall Walker.
- Head back to Adriana Weaver, turn in Dead in the Water.
You should be level 25 now, if not your not doing enough Rifts. Remember this game is not like other games where you can purely speed level through quests. You'll miss out on a lot as quite often there are 5+ quests that open depending on level in each zone.
That raps up this guide, see you on the next one!
No comments:
Post a Comment